 how-to
How to Dial in Espresso Grind for Beginners
Table of Contents
- What Dialing In Espresso Means
- Starting Your Espresso Grind Size for Beginners
- Measuring Espresso Output by Weight and Time
- Espresso Shot Time and Ratio: Finding Your Target
- Adjusting Grind Size When Espresso Tastes Sour
- Fixing Bitter Espresso Through Grind Adjustment
- Fine-Tuning Your Espresso: Common Mistakes and Troubleshooting
- Frequently Asked Questions
Last Updated: October 20, 2026
What Dialing In Espresso Means
To dial in espresso grind means adjusting your grinder to pull shots that taste balanced and consistent. It's not a one-time task, it's the process of finding the exact grind size that works with your specific machine, beans, and dose.
When you dial in, you're solving a puzzle. Your grinder controls how fine or coarse the ground coffee is. The espresso machine controls pressure and temperature.
Most beginners skip this step. They buy an espresso machine, grind some coffee, and hope for the best. The result is usually sour or bitter shots that taste nothing like specialty espresso should.
At laffogatocoffee.com, we work with home baristas who want to move past guessing and start pulling shots with intention. The good news: dialing in is learnable. You don't need years of experience. You need a system.
Starting Your Espresso Grind Size for Beginners
Finding the right starting grind size is your first real decision. Too fine and your shot runs slow or doesn't flow at all. Too coarse and water rushes through without extracting flavor. Before you touch the dial, though, you need to know what kind of grinder you're working with, because the adjustment mechanics change how you should approach the first shot.
Know Your Grinder: Stepped vs. Stepless
Espresso grinders fall into two broad categories, and beginners often fight their equipment because nobody explained the difference.
Stepped grinders have fixed positions, numbered clicks or notches. Each click is a discrete jump. On many entry-level espresso grinders, one click can shift shot time by several seconds, which makes small corrections feel impossible. If your grinder is stepped, you cannot fine-tune between clicks.
Stepless grinders have a continuous dial with no fixed positions. You can nudge the burrs by fractions of a mark. This is more precise but also more dangerous for beginners, because it's easy to lose track of where you started.
A third variable is adjustment sensitivity. On some grinders, moving two numbers is a tiny change; on others, it's a massive one. There is no universal 'one or two settings' rule.
Choosing a Starting Dose
Your dose is how much ground coffee you pack into the portafilter basket. Most baskets are designed for a specific dose range, usually 14 to 20 grams for single shots and 18 to 22 grams for double shots.
Start with the double shot approach. A double shot is forgiving and gives you room to adjust. Begin with 18 grams of ground coffee in your basket.
Why 18 grams? It's a middle ground. It works with most machines and most baskets. If your machine or basket is different, check the manufacturer's recommendation first.
Measure your dose on a scale. Don't eyeball it. A scale costs under $30 and removes the guessing game. Consistency starts here.
Setting Your Initial Grind
To dial in espresso grind effectively, start somewhere in the middle of your grinder's range, not the finest setting, not the coarsest. If your grinder has numbered settings from 1 to 10, start around 5 or 6. If it has a dial, start halfway between the extremes.
Grind your 18 grams of coffee. Tamp it firmly and evenly into the basket. Tamping pressure matters less than consistency, use the same pressure every time.
Now pull your first shot and watch what happens. Record the grind setting, dose, yield, and shot time before you change anything. That record is your baseline, and every future adjustment is measured against it.
Measuring Espresso Output by Weight and Time
This is where precision matters. You need two tools: a scale and a timer.
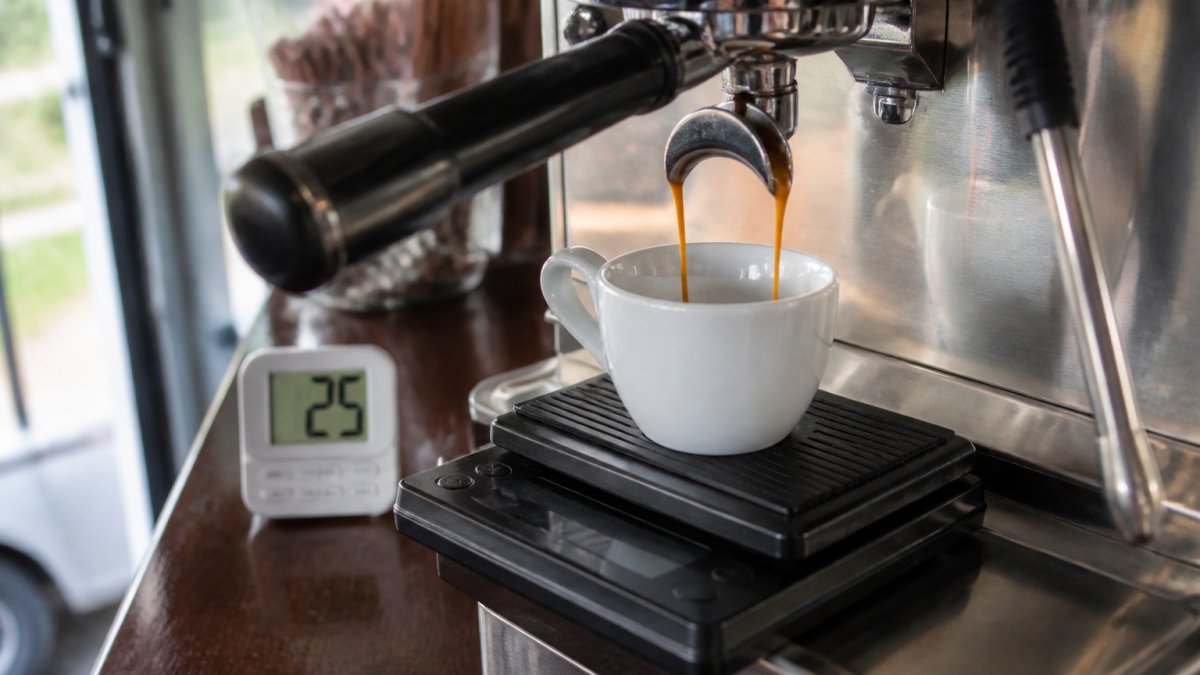
Weigh your espresso output in grams. Put a small cup on the scale, tare it to zero, then pull your shot into that cup. Note the final weight.
Time your shot from the moment water first touches the coffee until you stop the flow. Most shots take 20 to 30 seconds.
Write both numbers down. You'll need them to know what to adjust next.
A common starting point is this: if you put in 18 grams of coffee, aim for 36 grams of liquid espresso. That's a 1:2 ratio, one part coffee to two parts liquid.
This isn't a rule carved in stone. It's a starting point. Different beans, different machines, and different taste preferences will push you in different directions.
Espresso Shot Time and Ratio: Finding Your Target
The relationship between your dose, yield, and shot time tells you everything about extraction.
The Double Shot Starting Point
A double shot with 18 grams in and 36 grams out, pulling in 25 to 30 seconds, is the classic recipe. It works because it balances extraction time with flavor development.
If your first shot hits this target, congratulations, your grind is already close. Taste it. Does it taste good? If yes, you're done dialing in. If no, move to the next section.
Timing Your Pull
Pull your shot and watch the clock. If your shot finishes in under 20 seconds, it's running too fast. Water is flowing through without extracting enough flavor. This usually means your grind is too coarse.
If your shot takes longer than 35 seconds, it's running too slow. Your grind is too fine, and over-extraction is making the shot taste bitter.
Between 25 and 30 seconds is your target zone. That's where most balanced shots live.
Adjusting Grind Size When Espresso Tastes Sour
Sour espresso means under-extraction. The water didn't stay in contact with the coffee long enough to pull out the good flavors.
Your shot probably ran fast, finished in under 20 seconds. The fix is simple: make your grind finer.
Move your grinder down one or two settings. Grind fresh coffee and pull another shot. Time it. If it's now between 25 and 30 seconds, you're in range.
Taste the shot. Does it taste better? Sweeter? Less sharp?
If it's still sour, go finer again. Keep adjusting until your shot time hits the target zone and the sour taste disappears.
This adjustment might take three or four shots. That's normal. You're training your hand and your palate at the same time.
Fixing Bitter Espresso Through Grind Adjustment
Bitter espresso means over-extraction. Water stayed in contact with the coffee too long and pulled out harsh, burnt flavors.
Your shot probably ran slow, took longer than 35 seconds. The fix is the opposite of sour: make your grind coarser.
Move your grinder up one or two settings. Grind fresh coffee and pull another shot. Time it again. You're aiming for 25 to 30 seconds.
Taste the shot. Does the bitterness fade? Does it taste smoother and sweeter?
If it's still bitter, go coarser. Keep adjusting until the shot time and taste improve.
Remember: each adjustment is small. One or two grinder settings at a time. Big jumps waste coffee and make it hard to track what's actually working.
Fine-Tuning Your Espresso: Common Mistakes and Troubleshooting
Once your shots are hitting the target time and tasting decent, the real work begins. This is where most home baristas get stuck, they have a working shot, but it's not great yet. The fix is to stop guessing and follow a decision tree: read the symptom, make one change, pull again, and record the result.
The Troubleshooting Decision Tree
Use shot time, flow, and taste together. Never change two variables at once.
Shot runs fast (under 20 seconds) and tastes sour or thin: The grind is too coarse.
Shot runs slow (over 35 seconds) and tastes bitter or harsh: The grind is too fine. Go coarser by one increment.
Shot time is in range but taste is sour: Under-extraction despite correct time usually points to channeling or an uneven puck, not grind.
Shot time is in range but taste is bitter: Over-extraction at correct time often means water temperature is too high or the puck is channelling in a way that over-extracts some grounds.
Shot sputters, sprays, or flows unevenly from the portafilter: This is channeling. Stop adjusting grind and fix puck prep first.
Puck Preparation and Channeling
The puck is the compressed coffee in your portafilter basket. How you prepare it matters.
Tamp evenly. A crooked tamp creates weak spots. Water finds those spots and rushes through without extracting properly. This is called channeling. Your shot will taste thin and sour even though your grind is correct.
Distribute the ground coffee evenly in the basket before tamping. Some baristas use a distribution tool, a small device that breaks up clumps and spreads the grounds evenly. Others use their finger or a small spoon. The goal is the same: no clumps, no empty spots.
Tamp straight down. Keep your hand level. Press firmly and hold for a second. Then pull straight up without twisting.
A level, even puck pulls an even shot. An uneven puck channels, and channeling ruins everything, no grind setting can compensate for it.
Adapting to New Beans and Environmental Changes
You dialed in your espresso with one batch of beans. Now you bought a different roast or a different origin. Your shots taste wrong again.
This is normal. Different beans have different density and moisture content. What worked for your last batch might not work for this one.
When you switch beans, start by pulling a test shot at your current grinder setting. Time it and taste it. If it's running fast, go finer. If it's running slow, go coarser.
Environmental changes matter too. Humidity affects how coffee behaves. A humid day might slow down your shot. A dry day might speed it up. Small adjustments to your grind can compensate.
This is why keeping a shot log is so valuable. You'll see patterns. You'll know what adjustments work for different conditions.
Keeping a Shot Log
Start a simple notebook or spreadsheet. Record:
- Date and time
- Bean name and roast date
- Grind setting
- Dose in grams
- Yield in grams
- Shot time in seconds
- Taste notes (sour, bitter, balanced, sweet, etc.)
- Any adjustments you made
After 20 or 30 shots, patterns emerge. You'll see which grind settings work best for your beans. You'll notice how humidity affects your shots. You'll remember what adjustment fixed a problem last time.
A shot log turns dialing in from random adjustments into a system. You're no longer guessing. You're learning.
Frequently Asked Questions
How do I know if my espresso grind is too fine or too coarse?
Grind size directly affects shot time and extraction. If your espresso pulls in under 20 seconds, your grind is too coarse, adjust finer. If it takes longer than 30 seconds or drips very slowly, your grind is too fine, adjust coarser. Taste also signals grind problems: sour espresso usually means coarse grind (under-extraction), while bitter espresso typically indicates fine grind (over-extraction). Use a timer and scale to dial in precisely.
What should a beginner espresso shot time be?
Aim for 25-30 seconds from the moment you start the pump to when the shot finishes flowing. This timeframe works for most double shots (18 grams in, 36 grams out). Shorter shots taste sour and thin; longer shots turn bitter and harsh. A timer removes guesswork and helps you dial in consistently. Once you hit your target time, evaluate taste and adjust grind size if needed.
How many grams of coffee should I use for a double espresso?
Start with 18 grams of ground coffee in your portafilter basket. This is a standard double-shot dose. Aim to pull 36 grams of liquid espresso (a 1:2 coffee-to-water ratio). If your machine or basket is smaller, scale down proportionally, a single shot uses roughly 9 grams in and 18 grams out. Weigh your dose on a scale before pulling; this removes inconsistency and makes troubleshooting easier.
Should I change the grind size or the dose first when dialing in?
Always adjust grind size first. Start with your standard dose (18 grams for a double), then dial in the grind until you hit your target shot time of 25-30 seconds. Once grind is dialed, keep it there and adjust dose only if you switch beans or machines. This workflow prevents confusion and wastes less coffee. Changing grind is your primary tuning tool; dose adjustments come later as you gain experience.